Belcarra USBLAN for Windows Driver
How to Uninstall Drivers Correctly
How to Uninstall Drivers Correctly
Overview
This document will describe how to correctly uninstall the Belcarra USBLAN for Windows Driver.
Belcarra’s USBLAN driver for Windows is installed using a setup.bat script which in turn runs the Microsoft Tool DPInst to install the driver in the DriverStore on that Windows system.
DPInst adds an entry, which represents each driver package, to the Programs and Features in the Control Panel. These entries can be used to remove the driver packages from the Windows system.

The Device Manager program also supports uninstalling a device and optionally removing the driver software.
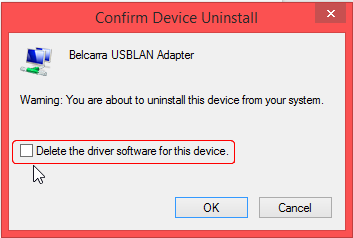
If the Device Manager is used to remove a device and the “Delete the driver software for this device” is 'ticked', the script installed for use with the Program Feature menu will no longer work correctly. The entry in the Program feature menu will fail with an error and cannot be removed from the list.
To correctly uninstall a single device, or all devices and the software package follow the instructions below.
Use the Device Manager but DO NOT tick the option box to delete the software for the device. This will delete the previously selected device but leave the driver package installed.

N.B. The device must be plugged in before Device Manager will show the device and allow you to uninstall it.
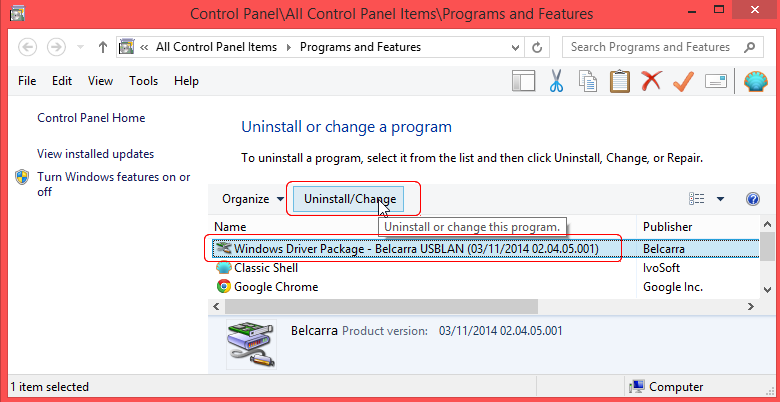
Use the Programs and Features Panel from the Control Panel. Find the correct Windows Driver Package, select it and then click on “Uninstall/Change”. This will delete all of the associated devices with the driver package and then remove the entry in the Programs and Feature Panel.

If the device and driver software were incorrectly removed using the Device Manager (the tick box was selected) and you need to remove the Program Features entry use the following procedure.

Once this process is complete, you can then use the Program and Features procedure for correctly removing the package and any installed devices using the driver.
The Device Manager program also supports uninstalling a device and optionally removing the driver software.
To correctly uninstall a single device, or all devices and the software package follow the instructions below.
Uninstalling a Single Device
Use the Device Manager but DO NOT tick the option box to delete the software for the device. This will delete the previously selected device but leave the driver package installed.
N.B. The device must be plugged in before Device Manager will show the device and allow you to uninstall it.
Uninstall All Devices and the Driver
Use the Programs and Features Panel from the Control Panel. Find the correct Windows Driver Package, select it and then click on “Uninstall/Change”. This will delete all of the associated devices with the driver package and then remove the entry in the Programs and Feature Panel.
N.B. It is not necessary to have the devices plugged in for this to remove them and to have the software removed.
Fixing an Incorrectly Uninstalled driver.
If the device and driver software were incorrectly removed using the Device Manager (the tick box was selected) and you need to remove the Program Features entry use the following procedure.
- Unpack the original driver kit into a new directory, DO NOT run setup.bat
- Plug your device into the Windows system
- Wait for Windows to “fail” to install the drivers
- Run Device Manager and find the device
- Right Click and use “Update Driver Software”
- Use the Browse my computer for driver software option
- Find the directory and allow the device manager to install the software
Once this process is complete, you can then use the Program and Features procedure for correctly removing the package and any installed devices using the driver.

